When it comes to enhancing the aesthetics and functionality of your home, choosing the right LL Flooring is of paramount importance. Lumber Liquidators, better known as LL Flooring, offers a wide range of flooring options to suit every taste and lifestyle. In this comprehensive guide, we’ll explore the different types, styles, and installation considerations of LL flooring to help you make an informed decision for your next home improvement project.

Table of Contents:
1. Introduction
1.1 Understanding LL Flooring: A Brief Overview
2.Exploring Diffe rent Types of LL Flooring
2.1 Hardwood Flooring
2.2 Laminate Flooring
2.3 Vinyl Plank Flooring
2.4 Bamboo Flooring
2.5 Tile Flooring
3. LL Flooring Styles
4. LL Flooring Installation
4.1 Preparing for Installation
4.2 DIY Installation Guide
4.3 Hiring a Professional Installer
4.4 Tips for a Successful Installation
5. Conclusion
1. Introduction
1.1 Understanding LL Flooring: A Brief Overview
Before getting into the specifics, let’s take a moment to understand what makes LL Flooring such a popular choice among homeowners. From its humble beginnings, LL Flooring has earned a reputation for providing high-quality, durable and stylish flooring solutions at competitive prices.

2.Exploring Different Types of LL Flooring
2.1 Hardwood Floors: LL Flooring has an impressive selection of hardwood floors ranging from classic oak to exotic Brazilian cherry. Learn about the unique characteristics of each wood type and their suitability for different locations.
2.2 Laminate Flooring: If you want the look of hardwood without breaking the bank, LL’s laminate flooring is an excellent option. Explore the variety of styles and finishes available, and learn how to maintain them for long-lasting beauty.
2.3 Vinyl Plank Flooring: LL Flooring’s vinyl plank options mimic the appearance of hardwood while providing superior durability and resistance to moisture. Uncover the benefits of vinyl plank flooring and explore design options that suit your decor preferences.
2.4 Bamboo Flooring: For eco-conscious homeowners, LL’s bamboo flooring is an attractive and sustainable option. Learn about its fast renewal properties and the unique look it can bring to your living space.
2.5 Tile Flooring: LL Flooring’s tile collection brings versatility and creativity to your floors. Discover a diverse selection of ceramic, porcelain and natural stone tiles, and how they can transform your kitchen, bathroom or entryway.
3. LL Flooring Styles
LL Flooring offers a diverse range of styles to meet different design preferences and interior themes. Here are some popular LL flooring styles:
- Rustic Farmhouse: This style embodies a warm and inviting feel, often featuring vintage hardwood floors or wood-look laminate with vintage textures. It complements farmhouse and country-themed interiors.
- Modern Elegance: LL Flooring offers sleek and contemporary options, such as smooth and shiny laminate, or polished porcelain tile. These styles work well in modern, minimalist, or urban-chic settings.
- Classic Traditional: For those who prefer timeless appeal, LL offers classic hardwood flooring with rich finishes and traditional designs. This style adds sophistication and charm to traditional home decor.
- Coastal and Beach: LL Flooring features light-colored hardwood, bamboo, or vinyl plank flooring that reflects the relaxed atmosphere of coastal living. These styles bring the feel of the beach indoors.
- Vintage and retro: LL’s collection includes flooring options with old-fashioned designs, such as retro-inspired patterns for vinyl and colorful mosaic tiles for a vintage vibe.
- Eclectic Mix: LL Flooring also offers unique styles that cater to diverse tastes. This can include mixed material designs, creative tile patterns, or reclaimed wood floors with character.
- Natural and organic: LL’s selection includes sustainable and eco-friendly flooring options such as bamboo, cork and reclaimed wood, appealing to eco-conscious homeowners.
- Contemporary Gray Tones: LL Flooring offers a variety of flooring in modern gray shades, which have become a staple in contemporary interior design due to their versatility and timeless appeal.
- BOLD AND ARTISTIC: For those seeking a statement piece, the tiles and vinyl planks at LL Flooring feature artistic designs and patterns, perfect for accentuating certain areas in a room.
- Warm Earthy Tones: LL’s hardwood, laminate and vinyl collections include warm earthy tones like brown and beige, which bring a cozy and comfortable feel to any space.
4. LL Flooring Installation
4.1 Preparing for Installation
Preparing for LL Flooring installation is a crucial step to ensure a smooth and successful process. Proper preparation will not only help the installation go smoothly but also contribute to the longevity and performance of your new flooring.
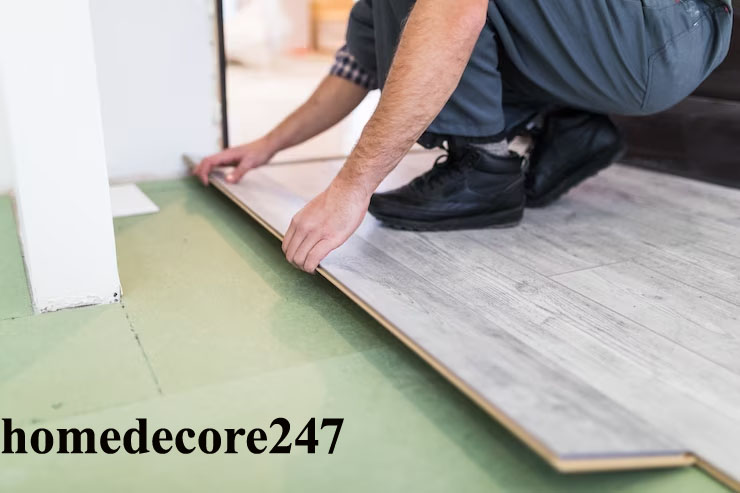
4.2 DIY Installation Guide
LL Flooring offers a variety of flooring options that can be installed as a DIY project. Although the specific installation process may vary depending on the type of flooring you choose, the following is a general DIY installation guide that applies to many LL Flooring products:

Note: Before beginning installation, carefully read and follow the manufacturer’s installation instructions and guidelines supplied with the flooring product. Also, make sure you have all the necessary tools and materials ready for installation.
There are some Steps For Installing:
Step 1: Prepare the Subfloor
Make sure the subfloor is clean, dry and level. Remove any debris, dust, or existing flooring material. Repair any damage or uneven areas.
Install a moisture barrier if necessary, especially for hardwood, engineered wood and bamboo floors, to prevent moisture from seeping through the subfloor.
Step 2: Adapt the Floor
Unbox the LL Flooring and allow it to acclimate to room temperature and humidity levels per manufacturer’s recommendations.
Leave the floorboards or tiles loose in the room for a few days to acclimatize to the atmosphere.
Step 3: Plan the Layout
Determine the best starting point for the installation. This is usually along the longest wall or main line of sight in the room.
Measure the width of the room and divide it by the width of the floor planks or tiles to determine the number of rows needed.
Use a chalk line to mark a straight reference line parallel to the starting wall to make sure the first row is installed straight.
Step 4: Install Underlayment (If Necessary)
Some types of LL flooring, such as laminate and vinyl plank, may require an underlayment for additional cushioning, sound reduction, or moisture protection.
Follow the manufacturer’s directions for installing the proper underlayment material.
Step 5: Install the First Line
Lay the first row of flooring along the reference line, making sure that the sides of the grooves or tongues face the wall.
Use spacers between the floor and the wall to allow for expansion. The spacers will later be covered by baseboard or trim.
Step 6: Continue the Installation
Connect the floor planks or tiles in the first row either by gluing them together (for click-lock systems) or using an adhesive specified by the manufacturer (for glue-down systems).
Use a tapping block and rubber mallet to ensure a snug fit between planks or tiles.
Continue installing subsequent rows, using a staggered pattern for a more stable and visually appealing installation.
Step 7: Trim and Transition the Pieces
Measure and cut the last floor line so that it is flush with the wall. Remember to leave the necessary expansion gap.
Install any necessary transition pieces over doorways or between different types of flooring.
Step 8: Finishing Touches
Remove spacers from walls.
Install baseboard or quarter-round molding to cover expansion gaps and provide a finished look.
Step 9: Clean Up
Clean the installed floor, removing any debris or adhesive residue.
Follow any additional maintenance instructions provided by the manufacturer to ensure the longevity of your LL Flooring.
4.3 Hiring a Professional Installer
Hiring a professional installer for your LL flooring can be a smart decision, especially if you want to ensure a flawless and hassle-free installation. Professional installers have the expertise, equipment and experience to handle a variety of types of LL flooring, and they can save you time and effort while providing high quality results.
4.4 Tips for a Successful Installation
To ensure a successful installation of your LL Flooring, whether you choose to DIY or hire a professional, follow these essential tips:
- Read and Understand the Instructions: Carefully read and understand the manufacturer’s installation instructions provided with your LL Flooring. Each flooring type may have specific requirements, and following the guidelines is crucial for a proper installation.
- Acclimate the Flooring: Allow the flooring to acclimate to the room’s temperature and humidity levels as recommended by the manufacturer. This step helps prevent issues like warping or gaps after installation.
- Prepare the Subfloor: Ensure the subfloor is clean, level, and free of moisture. Any imperfections in the subfloor can affect the stability and appearance of your new flooring.
- Use High-Quality Underlayment (If Needed): For certain flooring types, such as laminate and vinyl plank, using a high-quality underlayment can improve comfort, sound insulation, and moisture resistance.
- Plan the Layout: Plan the layout of the flooring, considering the starting point, direction of installation, and any patterns you want to create. A well-thought-out layout will enhance the overall appearance of the floor.
- Maintain Proper Expansion Gaps: Allow for expansion and contraction by leaving the required gaps between the flooring and the walls or fixed objects. Spacers can help maintain consistent gaps.
- Check for Proper Fit: Before permanently installing each piece, check that it fits correctly and aligns properly with adjacent pieces. This step prevents issues later in the installation process.
- Use the Right Tools: Use the appropriate tools and equipment for the installation, as recommended by the manufacturer. This ensures precise cuts and seamless joins.
- Follow Recommended Adhesive and Fastening Techniques: If your flooring requires adhesive or fastening, follow the manufacturer’s guidelines for the correct application methods and drying times.
- Verify the Pattern and Direction: Pay attention to the pattern and direction of the flooring installation, especially for styles like hardwood or laminate planks. Consistency in direction creates a visually appealing flow throughout the space.
- Trim and Finish Neatly: Take care when trimming and finishing the edges of the flooring. Use transition pieces at doorways and ensure all cut edges are clean and smooth.
- Clean Up Thoroughly: Remove any debris, adhesive residues, or dust from the installed flooring. Proper cleanup is essential to showcase the beauty of your new LL Flooring.
- Follow Maintenance Guidelines: After the installation is complete, follow the manufacturer’s maintenance guidelines to ensure the longevity and beauty of your LL Flooring.
- Address Any Issues Promptly: If you notice any problems during or after installation, such as gaps or loose pieces, address them promptly to avoid further complications.
5. Conclusion
Ultimately, LL Flooring remains a trusted and sought-after brand, offering premium flooring options that combine style, durability and affordability. Whatever your dream is for your home, LL Flooring is here to help you turn it into reality, making your living space a true reflection of your taste and personality. Choose LL Flooring, and embark on a journey to transform your home into a place you can truly call home.